

How To Use A Ir Sensor Arduino
How To Use A Ir Sensor Arduino: Electronics and robots require IR sensors. These sensors detect infrared radiation from all things above absolute zero. IR sensors are often used with Arduino, a versatile microcontroller platform, to make motion detectors, remote controls, and more.
How To Use A Ir Sensor Arduino
This page extensively covers Arduino IR sensor application. By the end of this course, beginners and intermediate makers will know how to connect, program, and install an IR sensor with Arduino.
What is an IR Sensor?
An IR sensor detects infrared radiation in its environment. IR transmitters (LEDs that emit infrared light) and receivers (photodiodes or phototransistors that detect it) make up the sensor.
The sensor reflects IR light to the receiver when an item passes in front of it. The sensor detects and occasionally distances objects based on light. Active and passive IR sensors exist. Passive sensors only detect infrared radiation from objects, while active sensors emit infrared light.
Why Use an IR Sensor with Arduino?
Arduino and IR sensors offer many options. Here are several reasons to use an IR sensor with Arduino:
Proximity detection: Perfect for robot obstacle detection and automatic doors.
Remote Control: Build a remote control system for electronics.
Line-following robots: Used for navigation.
Motion detection: For security or automated lighting.
You may simply develop projects that detect motion, proximity, or decode remote control infrared signals with Arduino and an IR sensor.
Components Required
The following are needed to begin:
- Uno, Nano, or Mega Arduino Board
- Sensor Module (IR emitter/receiver)
- Male-to-male or male-to-female wire connection
- Breadboard (optional but suggested for prototyp)
- Based on IR sensor and circuit needs, resistors
Make sure these components are ready before starting setup.
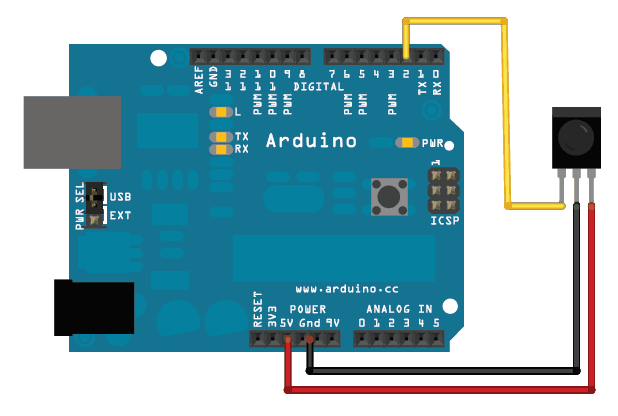
Connecting the IR Sensor to Arduino
Follow these steps to connect the IR sensor to your Arduino:
- Identify the Pins on Your IR Sensor Module: Typically, the IR sensor module has three pins – VCC, GND, and OUT.
- VCC: This is the power pin, usually connected to the 5V pin on the Arduino.
- GND: The ground pin, which should be connected to the GND on the Arduino.
- OUT: The output pin, which gives a signal to the Arduino when the sensor detects something.
- Connect the IR Sensor to the Arduino:
- Connect the VCC pin of the IR sensor to the 5V pin of the Arduino.
- Connect the GND pin of the IR sensor to the GND pin on the Arduino.
- Connect the OUT pin of the IR sensor to any digital I/O pin on the Arduino, such as pin 7.
- Check Your Connections: Double-check all your connections to ensure they are secure and correct.
Writing the Arduino Code
After connecting the IR sensor to the Arduino, write the code. Start Arduino IDE and write a sketch. A basic example will help you get started:
cpp
// Define the pin for the IR sensor

const int irSensorPin = 7; // Connect the OUT pin of the sensor to Arduino pin 7

int sensorValue = 0; // Variable to store the value from the sensor
void setup() {

  pinMode(irSensorPin, INPUT); // Set the IR sensor pin as input

  Serial.begin(9600); // Begin serial communication at a baud rate of 9600

}
void loop() {

  sensorValue = digitalRead(irSensorPin); // Read the value from the sensor

  Serial.println(sensorValue); // Print the sensor value to the serial monitor

  delay(100); // Wait for 100 milliseconds

}
Understanding the Code
- Pin Definition: We define the IR sensor’s pin (7 in this case).
- Setup: The setup() function initializes pin mode and serial connection.
- Loop Function: loop() reads the IR sensor value and writes it to the serial monitor. The sensor outputs HIGH (1) or LOW (0) if an object is detected.
- Use a USB cable to connect your Arduino board to your computer.
- Choose the Right Port and Board: Select your Arduino board under Tools > Board. Select the correct port under Tools > Port.
- Upload Code: Open the Arduino IDE and click Upload. After uploading, open Serial Monitor to see IR sensor output.
Testing the IR Sensor
To test your IR sensor:
- Launch Serial Monitor: A stream of 0s or 1s should appear.
- Move Your Hand in Front of the Sensor: The output should change when you bring your hand or object closer to the sensor, confirming detection.
If the sensor does not work as expected, check the following:
- Verify all connections.
- Upload the code to Arduino correctly.
- Make sure the IR sensor module is powered.
Troubleshooting Common Issues
- No Output on the Serial Monitor:
- Make sure the Arduino is linked to the computer.
Select the relevant Arduino IDE port.
Make sure the IR sensor is powered.
- Make sure the Arduino is linked to the computer.
- Continuous HIGH Output:
- Check for obstacles in front of the IR sensor.
Adjust IR sensor sensitivity with a potentiometer (if available).
- Check for obstacles in front of the IR sensor.
- Continuous LOW Output:
- Check IR LED functionality.
Check that the Arduino input pin is declared in the code.
- Check IR LED functionality.
Applications of IR Sensors with Arduino
After connecting and testing your IR sensor with Arduino, try these applications:
- Obstacle avoidance Robot: Navigate obstacles using several IR sensors.
- Automatic Light Control: Turn on a room light when someone enters.
- Build a proximity alert system to notify you when someone enters a restricted area.
- IR receivers can decode remote control signals to control fans, lights, and robotics.
Conclusion
IR sensors with Arduino can improve your projects by adding sensing. IR sensors are a simple but effective tool for robotics, security, and ideation. Following this guide, you can confidently connect, code, and troubleshoot an Arduino IR sensor.
You must experiment to grasp electronics. Don’t be afraid to experiment with IR sensors and Arduino!